Authorization Strategies
Platformatic DB implements flexible, role-based authorization strategies that integrate seamlessly with external authentication services. This section outlines the available strategies and how to configure them.
Supported Authorization Strategies
Platformatic DB supports multiple authorization strategies to accommodate various security requirements:
JSON Web Token (JWT)
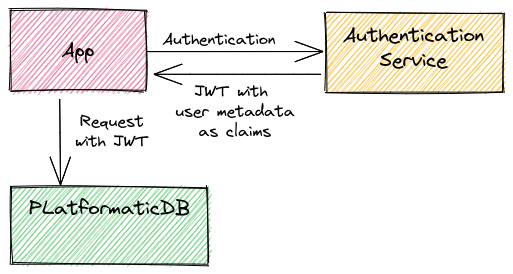
The JWT strategy is built on top of the @fastify/jwt plugin. By default, @fastify/jwt looks for JWTs primarily in the Authorization header of HTTP requests.

HTTP requests to the Platformatic DB API should include a header like this Authorization: Bearer <token>
Configuration
Set up JWT by specifying a shared secret in the Platformatic DB configuration file as shown below:
{
  "authorization": {
    "jwt": {
      "secret": "<shared-secret>"
    }
  }
}
See the @fastify/jwt documentation
for all the available configuration options.
JSON Web Key Sets (JWKS)
The JWT authorization strategy includes support for JSON Web Key Sets. For enhanced security, configure JWT to use JWKS for dynamic public key fetching:
{
  "authorization": {
    "jwt": {
      "jwks": {
        "allowedDomains": [
          "https://ISSUER_DOMAIN"]
      }
    }
  }
}
When a JSON Web Token is included in a request to Platformatic DB, it retrieves the
correct public key from https:/ISSUER_DOMAIN/.well-known/jwks.json and uses it to
verify the JWT signature. The token carries all the information, like the kid,
which is the key id used to sign the token itself, so no other configuration is required.
JWKS can be enabled without any options:
{
  "authorization": {
    "jwt": {
      "jwks": true
    }
  }
}
When configured like this, the JWK URL is calculated from the iss (issuer) field of JWT, so
every JWT token from an issuer that exposes a valid JWKS token will pass the validation.
This configuration should only be used in development, while
in every other case the allowedDomains option should be specified.
Any option supported by the get-jwks
library can be specified in the authorization.jwt.jwks object.
JWT Custom Claim Namespace
JWT claims can be namespaced to avoid name conflicts. If so, we will receive tokens
with custom claims such as: https://platformatic.dev/X-PLATFORMATIC-ROLE
(where https://platformatic.dev/ is the namespace).
If we want to map these claims to user metadata removing our namespace, we can
specify the namespace in the JWT options:
{
  "authorization": {
    "jwt": {
      "namespace": "https://platformatic.dev/"
    }
  }
}
With this configuration, the https://platformatic.dev/X-PLATFORMATIC-ROLE claim
is mapped to X-PLATFORMATIC-ROLE user metadata.
Webhook
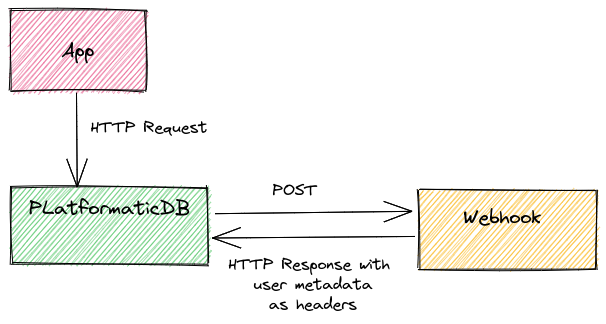
Authenticate API requests by configuring a webhook that Platformatic DB will call with each request.

Configuration
Define the webhook URL in the authorization settings:
{
  "authorization": {
    "webhook": {
      "url": "<webhook url>"
    }
  }
}
When a request is received, Platformatic sends a POST to the webhook, replicating
the same body and headers, except for:
hostconnection
In the Webhook case, the HTTP response contains the roles/user information as HTTP headers.
HTTP headers (development only)
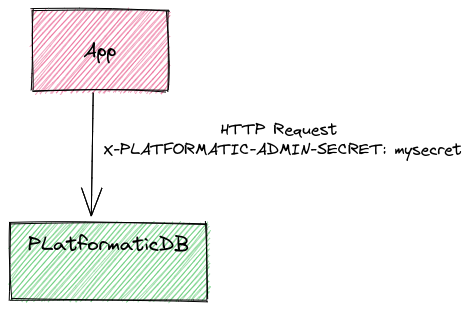
If a request has X-PLATFORMATIC-ADMIN-SECRET HTTP header set with a valid adminSecret
(see configuration reference) the
role is set automatically as platformatic-admin, unless a different role is set for
user impersonation (which is disabled if JWT or Webhook are set, see user-impersonation).

Passing an admin API key via HTTP headers is highly insecure and should only be used during development or within protected networks.
The following rule is automatically added to every entity, to allow users with adminSecret to perform all operations on any entity:
{
  "role": "platformatic-admin",
  "find": false,
  "delete": false,
  "save": false
}
Custom authorization strategies
You can create your own authorization strategy using a addAuthStrategy function. addAuthStrategy accepts a strategy name and a createSession function as a params. createSession function should set request.user object. All custom strategies will be executed after jwt and webhook default strategies.
Example
app.addAuthStrategy({
  name: 'custom-auth-strategy',
  createSession: async (req, reply) => {
    req.user = { id: 42, role: 'admin' }
  }
})
Issues
If you run into a bug or have a suggestion for improvement, please raise an issue on GitHub or join our Discord feedback channel.